 |
| Side by side hugels in Vancouver BC in early July. Photo is looking south. |
 |
The old garden site ready for a fresh new look.
In the background, last year's cob fireplace project.
|
We toyed with a number of ideas but none seemed capable of overcoming the above mentioned challenges without either investing a lot of start-up money or committing to watering the gardens daily or more through the summer
In the end, through much early morning winter internet surfing, we settled on giving Hugelkultur a go.
Hugelkultur, for those who don't know, is thoroughly covered here. In short, it involves building a large and infinitely densely packed pile of tree branches that is then subsequently layered in various coats of organic detritus. The benefits of this being that:
(1) Wood absorbs, stores, and slowly releases water all but completely obviating the need to water.
(2) The organic load slowly releases nutrients eliminating any need to fertilize.
(3) The organic load gradually breaks down releasing energy in the form of heat which in turn warms the beds and extends growing seasons.
(4) The decaying organic matter opens up air spaces that continually shift, aerating the beds eliminating the need to till.
(5) Organic surface mulches keep weeds at bay, and moisture and warmth locked in.
(6) The hugelkulture shape facilitates ease of planting, maintaining, and harvesting. It also greatly increases growing space.
(7) The more voluminous and dense the organic load, the longer lived the hulgelkultur. Some people say that they can last upwards of 2 decades with minimal maintenance.
(8) You can pee on these gardens! Urine contains nitrogenous compounds which helps offset the nitrogen consumption exerted by the early phase decomposition of wood.
(9) Best of all. These gardens are FREE!!
We built ours in January 2014.
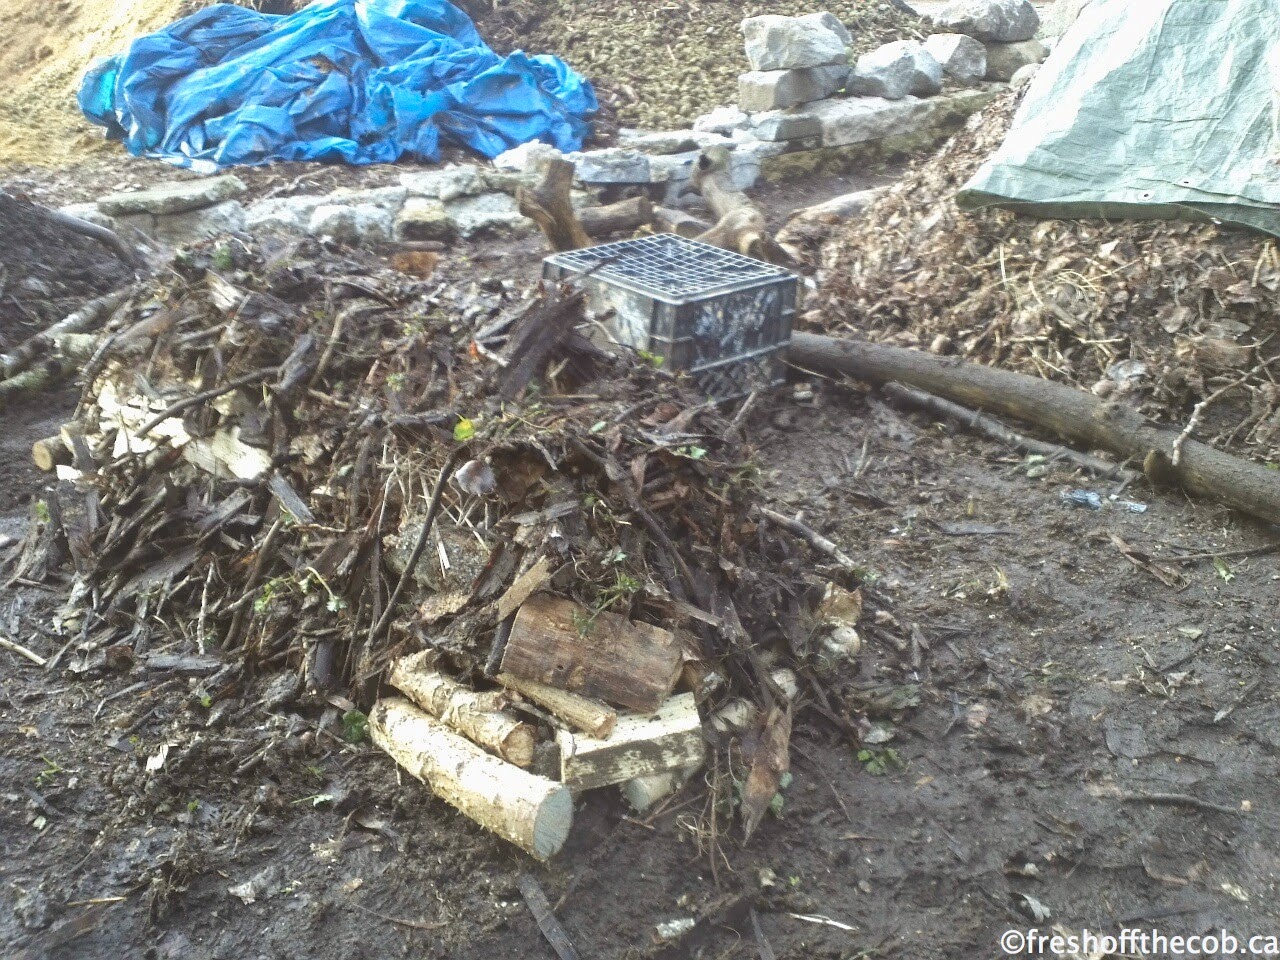
Our first Hugel turned out to be roughly 20' long by 4' wide by 3' tall. We mapped out the footprint that felt to be the right size for the space and then began stacking in the wood. The site is shown in the photo above. We started with the largest logs on the bottom, lining them up side by side as densely as we could. Any gaps between these logs were stuffed with smaller branches and twigs.
Like this we continued to build the mound up, laying down layer after layer of larger branches woven together with smaller branches. Our goal was to end up with a super densely packed pile of wood of various sizes. The mound slopes quite steeply up to a soft ridge peak.
The end result was a pile of wood that was so dense and knitted together that we could easily run up and down the sides without disturbing it's form whatsoever.

This wood pile was then layered in a blanket of grass clippings, several inches thick so that no evidence of the wood was visible beneath and the mound looked like a solid pile of grass clippings.
At the end we provide suggestions on where to find these organic materials. Those living in BCs lower mainland are welcome to come take some of our loot off our hands. See below.
 |
We have already started adding the manure in this photo.
In the background is the top soil set aside from the old gardens.
|
Then came a layer of yard trimmings, leaves, hedge clippings, compost and whatever other organic bulk we had laying around that needed tidying up.
Next we layered on a thick layer of rotting horse manure. This layer was probably 6 or so inches thick. Fresh manure could also be used if the hugel is built many months before planting season and left to decompose in the fall/winter weather. From what we have read, lots and lots of manure is essential to the early phases of these gardens as the wood apparently leaches up nitrogen from its surroundings as it decomposes. Adding a healthy dose of manure allows a nutrient balance to be optimally maintained.
Those who find themselves manure poor can usually find ample sources in the farming outskirts of cities. BC Lower Mainlanders can help themselves to our supply. See contact below.
 |
| Horse manure layer. |
On top of the manure we put a thin layer of top soil. This layer is probably 2 inches thick at most. It isn't even clear that a layer of soil serves any purpose but we had lots left over from shutting down our box planters so we used some.
Finally we covered the entire hugel in a thick layer of leaves and left it to sit out in late winter rains for a month or so before planting.
We also built a mini hugel to use as a herb garden, as well as two other larger ones. The more we built, the more confident we got and built the last two to be very steep and tall which, as it turns out, works better for holding on to moisture and increases the planting surface area compared to a shorter softer hugel.
THE MINI HUGEL:
 |
Mini hugel large wood pieces.
|
 |
Mini hugel woven with small sticks/twigs.
|
 |
| Mini hugel grass clippings. |
 |
Mini hugel manure layer.
|
 |
| Mini hugel mulched in leaves and planted with herbs. |
THE TALL STEEP HUGELS:
 |
Early in the wood build. Larger, more loosely
packed branches.
|
 |
| Increasingly small branches woven in to the pile. In the background, a completed straw mulched hugel. |
 |
| Even smaller branches and twigs woven in. |
 |
| Grass clippings, fresh off the field in the background. Jen has her first sun burn of the year. |
 |
| Horse manure layer. |
 |
| A finished hugel next to a top soil hugel waiting to be mulched. This is the same view as the photo at the top of the post. The arch in that photo spans between these two hugels. |
In the meantime, our veggie plants were thriving in their indoor apartment sized greenhouse. We made pots out of newspaper which allowed us to just plop them in to the hugel come planting time.


We planted the first hugel with various berry plants (honey, lingon, goose, currant, cranberry) in February. We also used cattle wire to make arches to expand our vertical growing space. Green poplar branches woven through the wire worked great to give the arches a bit more stability. We put up cattle wire arches around the 2 tall steep hugels too.

 |
Herbs are thriving in the mini hugel in the foreground.
Green poplar branches can be seen adding strength to the cattle wire arch.
|
We planted the seed raised veggies (tomatoes, squash, cucumbers, peppers, melons) toward the end of March. In previous years we have been unable to plant before the May long weekend due to cold, wet, mucky clay earth. When planting these gardens the most notable feature was how warm the beds were on cold Vancouver spring hands. Remarkable!
Within a couple of weeks we could clearly see significant growth of the plants.


And by mid July the hugels were a wild jungle of veggies!


And by mid July the hugels were a wild jungle of veggies!
 |
| Eugene is grazing in the background. |
 |
| Water melon |
 |
| Melon cucumbers! |
In June, the leafy mulch we had used on the first hugel was starting to really break down so we freshened it up with a generous layer of straw bedding mucked out from the barn.
The large first hugel is in a roughly 50% shade area, only getting sun between 11am and 5pm in the peak of summer. Despite this relative shade, the veggies and berries in this hugel have done better than any of our previous years' gardens which we fully attribute to the composition of the hugels.
We had another little area in near full shade that we had never managed to keep a garden going in so we made a hugel garden variation in this space for a shade garden. We took large tree trunk sections that were partly rotted out and arranged them on end, edge to edge, in a way that we liked. Then we filled the spaces between the logs with a layer a twigs, then a layer of grass, then compost, then manure, and planted shade plants in these areas. We encouraged moss growth on the surfaces of the logs and it has worked wonderfully!
Apparently, we have since learned, this style of garden is known as a Victorian Stumpery which we hadn't ever heard of before!
Apparently, we have since learned, this style of garden is known as a Victorian Stumpery which we hadn't ever heard of before!


It is now Sept 2014 and we continue to harvest tomatoes, summer squash, winter squash and cucumbers near daily from the hugels. Despite an uncharacteristically dry summer, we have watered our hugels exactly 3 times to date. Each one for 30 minutes each time. This is in contrast to the twice daily hour long waterings we have been accustomed to doing in our previous gardens throughout July, Aug, and Sept!
As the autumn wears on and our veggies crops slow, we will mulch the plants down on to the hugel, add another batch of rotted manure and a fresh straw mulch in anticipation of winter veggies planting. We will also continue to add grass clippings, twigs, and leaf litter to the hugels as they age in hopes of perpetuating their life span.
We are already excitedly planning our crop for next year, now that we know what the hugels are capable of. We are also intending to build another hugel next to the two tall steep ones. This hugel will be south facing like the others but shaded by a plum tree over head. We hope that this will prove a good bed for beans, and peas, and other cool loving edible plants.
Building a hugel is time consuming, mindless, repetitive work that we ultimately found to be quite therapeutic. Gather some friends to help out and it goes much quicker and makes an end of day beer that much more enjoyable. Particularly if you enjoy it while sitting in front of your cob outdoor fireplace!
The overarching concept of a hugel is highly adaptable to suit a variety of settings from urban lots to large acreages. We believe that this concept could even be translated to balcony planters by layering the same components in to clay pots. This is an experiment we intend to carry out on our north facing shaded balcony next year.
EPILOGUE:
No wood sources on your property, you say?
Tree wood is EVERYWHERE. Cities leave it lying on the road side for the taking. People post it on craigslist. Yard trimming companies will gladly haul branches and twigs to your doorstep for little or no cost. Arborists are veritable tree branch supermarkets. Clean (unpainted, untreated) lumber scraps work just fine too.
No horse manure, no grass clippings, no leaves?
Horse manure is easy to come by in the farming outskirts of all major cities. Look on craigslist, or go for a leisurely country drive and ask around. It's there, and people are DESPERATE to get rid of it!
Grass clippings and leaf matter are likewise not hard to come by. Ask your neighbours. Ask your local yard maintenance companies. Ask your parks and city workers. It's there, ripe for the taking.
Grass clippings and leaf matter are likewise not hard to come by. Ask your neighbours. Ask your local yard maintenance companies. Ask your parks and city workers. It's there, ripe for the taking.
If you live near Vancouver BC, we have copious amounts of aged as well as fresh manure compost available for absolutely FREE. We likewise keep our grass clippings as compost and are happy to have anyone who wants some haul as many hugels-worth away as they please. Used straw bedding is also plentiful and works wonders as garden mulch. We're located near UBC. Contact Dan at 604-868-5269 with interest about these items (he's not able to field any questions about the articles in this blog though as he isn't involved in any of these projects). He has a tractor and is willing to load trucks for a small fee for those wanting large amounts.
As usual please don't hesitate to post a comment or question and we hope we have inspired you to trial your own attempts at hugel gardens.
 |
| Slimmy the goat. |
This is really amazing
ReplyDelete